
TRAVERSE Global v11.1
Transactions
Use the Transactions function to enter GL Journal transactions, such as revenues, expenses, and asset acquisitions.
You can make journal entries to any of the periods that are not closed in the Period Conversion table, at any time in the fiscal period or year. Only transactions associated with the current fiscal year appear. To view transactions from a different fiscal year, change the fiscal year using the Change Fiscal Year function on the Periodic Processing menu.
The transactions entered are “private” or user- and workstation-specific, meaning only the logged in user on the workstation they entered the transaction on can view or edit the transactions. Once the transactions are written to the journal they become “public”, or viewed and editable by all users with permissions to the edit transactions function.
Set the General Ledger Business Rule Use Batch Processing to Yes to write the entries to the journal in a batch.
Note: You don't need to use the Transactions function to enter all GL Journal transactions. Other TRAVERSE applications (such as Accounts Payable/Purchase Order, Accounts Receivable/Sales Order, Inventory, and Bank Reconciliation) update the GL Journal with the proper entries if you interface them with General Ledger.
Use the Import button on the toolbar to open the Import Mapped Data function to import transaction data.
If you use other functions to update the GL Journal, you still must use the Transactions function to make miscellaneous entries and adjustments.
![]()
- To enter a new transaction, click the New button on the toolbar.
- Select a Batch Code, if you have the business rule set to use transaction batching.
- Select or enter the Account ID to which the transaction applies.
- Enter a Description of the transaction, for example, training. What you type here will print in the Description field on the GL Journal report.
- Enter the debit amount for the debit transaction in the Debit Amt box. For credit transactions, skip this field.
- Enter the credit amount for the credit transaction in the Credit Amt box. For Debit transactions skip this field.
- The current Date appears. Edit this date, if necessary.
- The fiscal Period corresponding to the transaction date appears. Use the default period, or enter a different period for the transaction.
- Enter a Source code for the transaction. You can accept the M1 default value or enter a different source code. The first character must be M for manual entries, except for automatically reversing accrual entries that must have the source code R1.
- Enter a Reference to identify the origin of the transaction. What you type here will print in the Reference field on the GL Journal report.
- Select the A box to allocate the transaction according to the account allocation record set up for the account when it is posted; otherwise, clear the box. If you select the box and there is no allocation for the account, a warning message appears.
- Select the C box to include the transaction in the Cash Flow Statement. Clear the box to exclude the transaction from the Cash Flow Statement (for example, in the case of a correcting entry). Clear the box only if you are sure that the transaction is not a cash flow transaction. Incorrect entries can result in an erroneous Cash Flow Statement.
- Enter a Comment that describes the group of transactions you are entering. The comment will be displayed in the SM System Audit | Activity function, to better reference the group of transactions you are writing to the journal.
If you selected Yes to the business rule requiring a comment, you will not be allowed to write transactions until a comment has been entered.
- Click the Allocation button on the toolbar to associate the transaction with a transaction allocation record. NOTE: This button is available only if you have the Not for Profit add-on installed and if you use transaction allocations.
The screen changes so that you can enter the transaction allocation ID to associate with the transaction and any segment values, if needed. See Allocating Transactions for more information.
After you associate a transaction with a transaction allocation record, the system clears the Account ID field and displays the allocate to accounts at the bottom of the screen, when the allocated transaction is selected.
When you associate a transaction with a transaction allocation record, the system automatically creates corresponding transactions in the GL Journal when you write the transaction to the journal. See Allocating Transactions for more information.
- Continue entering transactions until the balance at the bottom of the screen is zero. To split the offsetting amount between two or more accounts, enter the necessary additional transactions to bring the balance to zero.
Use the Toggle button ( ) to show transaction detail.
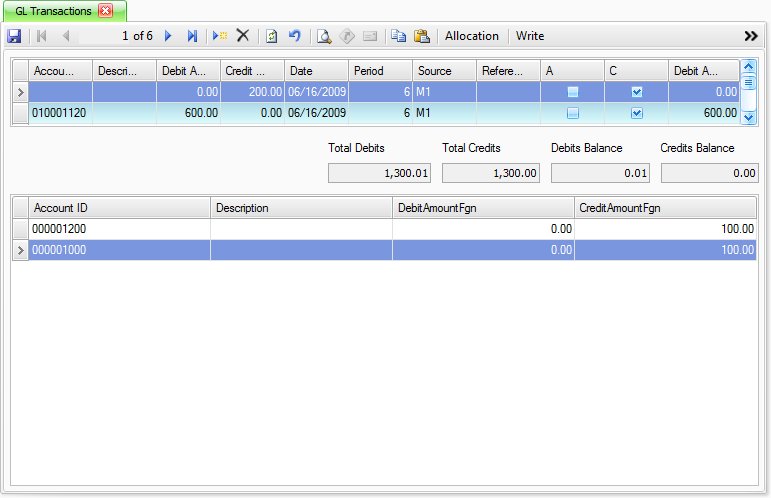
![]()
- To enter a new transaction, click the New button on the toolbar.
- Select a Batch Code, if you have the business rule set to use transaction batching.
- Select or enter the Account ID to which the transaction applies.
- Enter the foreign currency debit amount for the debit transaction in the Debit Amt Fgn box. For credit transactions, skip this field. This field is only available if you are using the multi-currency functions.
- Enter the foreign currency credit amount for the credit transaction in the Credit Amt Fgn box. For Debit transactions skip this field. This field is only available if you are using the multi-currency functions.
- The current Date appears. Edit this date, if necessary.
- The fiscal Period corresponding to the transaction date appears. Use the default period, or enter a different period for the transaction.
- Enter a Source code for the transaction. You can accept the M1 default value or enter a different source code. The first character must be M for manual entries, except for automatically reversing accrual entries that must have the source code R1.
- Select the A box to allocate the transaction according to the account allocation record set up for the account when it is posted; otherwise, clear the box. If you select the box and there is no allocation for the account, a warning message appears.
- Select the C box to include the transaction in the Cash Flow Statement. Clear the box to exclude the transaction from the Cash Flow Statement (for example, in the case of a correcting entry). Clear the box only if you are sure that the transaction is not a cash flow transaction. Incorrect entries can result in an erroneous Cash Flow Statement.
- Enter an Entry No, or leave the field blank to automatically accept the next available entry number when you write the transactions to the journal.
- If you use multicurrency and the account ID you selected uses a currency other than the base currency, that currency ID appears and the Exch Rate box is available.
Select or enter the exchange rate to use for the transaction, or press F6 to open the System Manager Currency Exchange Rates function to enter a new exchange rate.
- Enter the debit amount for the debit transaction in the Debit Amt box. For credit transactions, skip this field.
- Enter the credit amount for the credit transaction in the Credit Amt box. For Debit transactions skip this field.
- Enter a Description of the transaction, for example, training. What you type here will print in the Description field on the GL Journal report.
- Enter a Reference to identify the origin of the transaction. What you type here will print in the Reference field on the GL Journal report.
- Enter a Comment that describes the group of transactions you are entering. The comment will be displayed when you select the Activity button to better reference the group of transactions you are writing to the journal.
If you selected Yes to the business rule requiring a comment, you will not be allowed to write transactions until a comment has been entered.
- Click the Allocation button on the toolbar to associate the transaction with a transaction allocation record. NOTE: This button is available only if you have the Not for Profit add-on installed and if you use transaction allocations.
The screen changes so that you can enter the transaction allocation ID to associate with the transaction and any segment values, if needed. See Allocating Transactions for more information.
After you associate a transaction with a transaction allocation record, the system clears the Account ID field and displays the allocate to accounts at the bottom of the screen, when the allocated transaction is selected.
When you associate a transaction with a transaction allocation record, the system automatically creates corresponding transactions in the GL Journal when you write the transaction to the journal. See Allocating Transactions for more information.
- Continue entering transactions until the balance at the bottom of the screen is zero. To split the offsetting amount between two or more accounts, enter the necessary additional transactions to bring the balance to zero.
- Select the print preview button (
 ) to preview the report. This report shows transactions not yet written to the GL Journal
 - The preview report screen appears.
- Select the print button (
 ) in the toolbar to print your list.
![]()
- Click the Write button on the toolbar to write the transactions to the GL Journal.
Transactions are not immediately written to the GL Journal. Instead, they are held in a transaction work file that is associated with the workstation where the transactions were entered and the user id that entered the transactions. After you click the Write button, the transactions are written to the GL Journal and the current Transaction form is cleared. Use the Edit Transactions function to edit transactions that you have written to the GL Journal.
- If you close the screen without writing the transactions to the GL Journal you will get a warning message stating there are unwritten transactions remaining, do you want to continue to exit. You can click OK to close the form without writing the transactions to the journal or Cancel to return to the Transactions screen and write the transactions.
The Out of Balance dialog box appears when you click Write on the Transactions screen and the transactions, periods, or years are out of balance.
![]()
- Click Cancel to go back to the Transactions screen and manually adjust the out of balance entry.
- Enter the forced-balance password to override unbalanced entries and write them to the GL Journal. To set up or change the password, use the Business Rules function.
- Click Auto Enter to automatically create an entry for the out of balance amount on the Transactions screen.
The Allocation button on the toolbar is available if you have the GL Business Rule selected to Use Transaction Allocations, to help you allocate transactions to multiple accounts based on a transaction allocation ID.
![]()
- Click the Allocation button to assign a transaction allocation ID to the transaction, or select the Allocation ID to associate with the transaction. The allocation’s description, expiration date, and related notes appear.
- When available, select the account segment value to which to allocate the transaction. These boxes are available only if you cleared the check box for that segment in the Required Segments window on the Transaction Allocations screen. If none of these boxes are available, the transaction is automatically allocated to the segments set up in the Transaction Allocations function.
- Click OK to save your changes and return to the Transactions screen. After you associate a transaction with a transaction allocation record, the system clears the Account ID field and displays the allocate to accounts at the bottom of the screen, when the allocated transaction is selected.
- If the account corresponding to the segments selected for the transaction allocation does not exist, a red X appears next to the invalid account, prompting you that invalid accounts exists. Check the Chart of Accounts List and change your selections here or in the Transaction Allocations function to correct the problem.
- When the Transaction Allocation dialog box is closed, once the Allocation ID and account numbers are selected, the Account ID is left blank and an Allocation Detail dialog box is displayed below the Transactions dialog box.
- Select a transaction to delete from the Account ID field.
- Click the Delete button, on the toolbar, to delete the selected transaction.
- Click Yes at the "Are you sure you want to delete selected record(s)?" prompt.
The Tasks tab on the right side of the GL Transactions screen opens the GL Transactions Tasks Pane. The Tasks Pane serves as a quick way to view account information such as account class, account type, and descriptions of the account number segments.
You can pin and unpin the task pane to the side of the TRAVERSE window by clicking the pushpin icon. When the pushpin icon points down,  , you can always access the task pane. When the pushpin icon points to the left,
  , you must hover your cursor over the Tasks tab on the right-hand side of the TRAVERSE window to use the task pane.
Note: You can select True from the ShowTaskPanel field in the View > Preferences... screen to default task panes across the entire system to automatically expand when opening applicable functions. Selecting False in the ShowTaskPanel field defaults task panes to stay closed when opening applicable functions. Even when set to False, you can always use the pushpin icon to pin and unpin the task pane to the right-hand side of the TRAVERSE window.